How To Change Garage Door Extension Springs
This post contains affiliate links.
A garage door spring offsets the weights of garage doors, helping you to open and close them easily. However, as they age, the doors may feel heavier and heavier. This is because the springs have lost their pulling power.
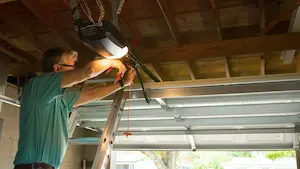
Most people tend to have the replacement work done by a professional. Still, the work is entirely doable as a DIY, provided you have the proper knowledge and the simple tools. How to change garage door extension springs?
To change garage door extension springs:
- Open the garage door fully and secure the door
- Detach the extension spring
- Disconnect the lift cable
- Disconnect the safety cable and remove the old spring
- Reattach the safety cable by threading it through the new spring
- Reattach lift cable
- Lubricate and test spring
This article discusses how you can replace your garage door extension springs. We also explore some of the knowledge you may need about garage springs, such as how they work and the safety precautions you need to take.
How Do Extension Garage Door Springs Work?
In general, extension garage door springs work by using two springs, pulleys, and cables. As the door closes, the pulleys and cable stretch out the spring, creating tension on the spring. When you open the garage door, the spring tension helps to pull the door up, making the door less heavy for you.
There are two common types of garage door springs. They are torsion and extension springs. The easiest way to tell is if you can see your naked springs beside your garage door, it is likely an extension spring system. Torsion springs tend to be kept inside a tube.
For this article, we will only look at extension springs.
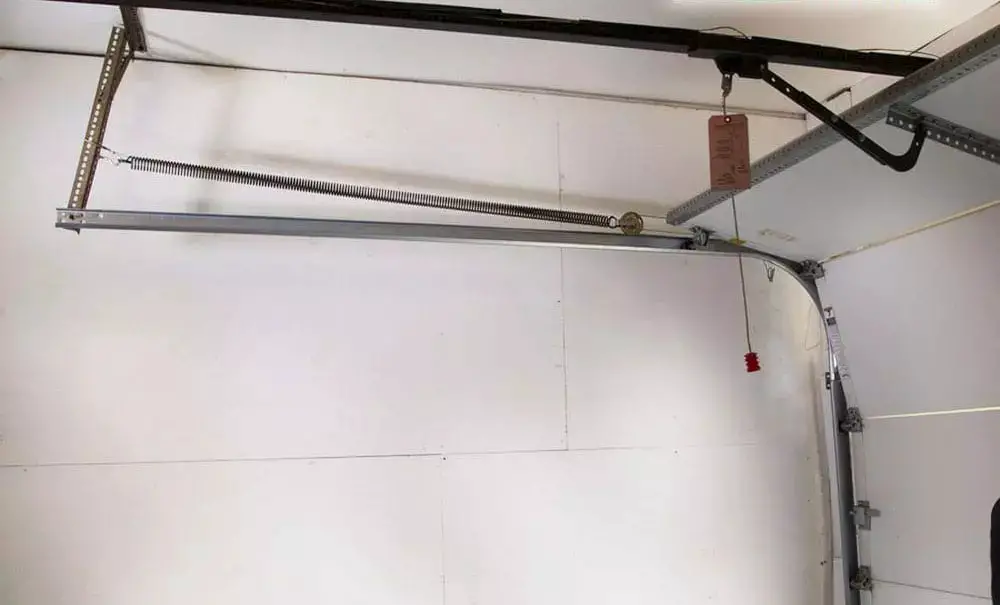
With the extension spring system, you generally will see two sets of springs, pulleys, and cables. Each set will be on one left side of the garage door, with the other on the right.
One end of the cable is usually anchored to the floor. And runs up and over a stationary pulley. The cable usually runs over and around two pulleys, one stationary and one movable. The stationary pulley is typically attached to the wall at the upper corner of the carriage door.
After running through one side of the stationary pulley, the cable runs over and around the movable pulley before returning to an anchored bracket, usually attached to the door track. The movable pulley is attached to the end of the extension spring.
You may also notice another cable that runs through the spring and anchors to the track brackets on each end.
This is a safety cable and is meant to keep the spring in place in case it breaks. This prevents the spring from flying around when it breaks, as they tend to break under tension.
When you close the door, the weight of the door pulls and stretches the spring. This creates tension that can be useful for you later.
When you reopen the door, the spring’s tension helps you pull the door up, reducing its weight. This makes it easier for you to reopen the garage door.
When Do Your Garage Door Springs Need Replacement?
Your garage door springs may need replacement when the garage doors feel heavier and heavier as you open them. The spring no longer generates enough tension to help you pull the door up. Garage spring doors cannot be serviced or repaired. The whole spring should be changed.
Generally, garage door springs are tough things. They labor in the shadows for years, sometimes decades, and do not break.
However, springs eventually will need replacement. As they age, the springs lose the ability to handle tension and revert to their original state.
The more frequently you open and close your garage doors, the more likely and faster your springs may fail.
The first sign of failure is usually that your doors are becoming increasingly harder to open. This is because the springs are no longer helping you with the work since it no longer generates enough tension to help lift the door.
If your garage door uses an electric motor system, you may notice the motor is struggling to lift the door up. This is because the motor is taking on more of the garage door’s weight, as the springs are no longer helping it. You may also notice the garage door taking a long time to open.
The second sign will be if you notice general disfigurement of the springs. Old springs generally do not curl up nicely, with bend marks visible. Some parts of the spring may also look overstretched, even when the spring is not under any tension.
If you notice rust forming on the garage springs, replace it immediately. This is because rust can very quickly destroy the flexibility and structural integrity of the spring, making it much easier to break.
The last sign will be if you hear a loud bang as you operate your garage door, similar to a gunshot. This may mean that your garage springs have broken, and you may not operate the garage door unless with 100% manual strength.
How To Select The Right Garage Door Extension Springs?
To select the correct garage door extension springs, simply refer to the color of the last coil, and purchase a replacement with a similar color. The color represents the door’s weight. The heavier the door weight, the thicker the springs usually are.
| Color | Weight (Pounds) | Weight (KG) |
| White | 10/110/210 | 5/50/95 |
| Green | 20/120/220 | 10/55/100 |
| Yellow | 30/130/230 | 15/60/105 |
| Blue | 40/140/240 | 20/65/110 |
| Red | 50/150/250 | 25/70/115 |
| Brown | 60/160/260 | – |
| Orange | 70/170/270 | 30/75/120 |
| Gold | 80/180/280 | 35/80/125 |
| Light Blue | 90/190/290 | 40/85/130 |
| Tan | 100/200/300 | 45/90/135 |
Fortunately, buying garage door extension springs is relatively easy. You only need to identify the color on the spring’s last coil and purchase a replacement spring with a similar color.
There are 10 colors, ranging from white to tan. The colors represent the weight of the garage door. Two similar springs can handle the weight.
You may see overlapping weight ratings because each color may represent a weight rating for light, medium, and heavy doors. As such, you may see each spring color in three levels of thickness.
For example, a green-colored spring may come in three thickness levels, thin, medium, and thick. Two thin green springs can handle a 20-pound garage door. Two medium green springs can handle a 120-pound garage door, while two thick green springs can handle a 220-pound garage door.
This means the best way to ensure you purchase the correct spring is to take the old spring to the store and compare it with the new spring for color and thickness.
How To Change Garage Door Extension Springs?
To change garage door extension springs, start by preparing the tools. Before removing the old spring, you then secure the door for safety precautions. Then you install the new spring before lubricating the spring. Finally, test and confirm that the replacement springs work well.
Replacing your own garage door extension springs is not rocket science. It is doable with the right tools and guidance.
The best thing is you can easily purchase your own springs from your local hardware store, and the tools needed are the common garage tools every home should have.
Step 1: Prepare The Tools
You only need basic home tools to get the job done. You may already have many of these tools lying around your home or garage. These are the things you can prepare to ensure a smooth replacement job: (Links to Amazon)
- 2 garage door extension springs
- A socket wrench
- A crescent wrench
- A lineman’s pliers
- A step stool or A ladder
- 2 C-clamps
- WD40 general lubricant or garage door/spring lubricant
- Duct tape
- Work gloves
- Eye protection glasses
Step 2: Secure The Door
Before commencing with the replacement work, you need to ensure two things. First, ensure that the spring has been totally unwound. This means opening the door in full.
It is very dangerous to attempt spring replacement while it is under tension. The spring may bounce violently and hit you or other things.
Aside from that, you also need to prevent the door from accidentally sliding down. This is also very dangerous as garage doors are rather heavy. Without the spring slowing down as it closes, you are talking about a large force slamming down to the ground.
It may either damage the door, the floor, or worse if you or someone else is under the door.
To secure the door:
- Put on your safety gear. We recommend at least a pair of work gloves and eye protection glasses.
- Open the door fully. Ensure that there is no longer any tension on the spring.
- If your garage door uses an electric motor, turn it off and unplug it. This prevents the motor from accidentally engaging.
- Identify the tracks of the garage door. You should see a track or rail where the garage door slides up or down.
- Using a C-clamp, position the clamp right on the track, right after where the garage door ends. Make sure to clamp tight.
- This helps to stop the garage door from closing if it moves.
- Take your ladder, open it up, and place it right at the center of the line where your garage door meets the floor.
- This is secondary protection. If your C-clamps fail, the ladder can stop the garage door from slamming onto the floor.
Step 3: Remove Old Spring
With the garage door secured, you can now remove the old spring. You will detach the old spring and disconnect the lift and safety cable. Then you can remove the old spring.
Throughout the process, it helps to be aware. Also, consider taking pictures or making references just in case you need them when reinstalling later.
To remove the old spring:
- Start by detaching the extension spring. You do this by unbolting the spring from both ends.
- The first end is connected to the pulley. Take a picture of the assembly for reference later.
- A socket and crescent wrench should help you unbolt the spring end from the pulley.
- Tape the pulley to the cable with duct tape. This helps with reinstalling later.
- Next, we will remove the safety cable. Observe how the cable was tied. Then take a picture of the safety cable for reference.
- Untie the safety cable, and remove it from the spring.
- The other end of the spring is usually attached to an I-bolt. The I-bolt, in turn, is bolted to a wall bracket close to the security cable.
- Observe and then take a picture for reference.
- Unbolt the I-bolt with your wrenches, and you can now remove the spring.
Step 4: Install New Spring
After removing the old spring, you can now take it to your hardware store and pick up a replacement.
If you have prepared your beforehand, you can also place it side-by-side with your replacement springs and see if they match.
The springs should have a similar color code and similar thickness. If not, you may need to change it, as the springs are unsuitable for your garage door.
Installing the extension spring is the opposite of removing it. You attach the spring to the wall bracket, thread it through the security cable, and then secure it back to the lift cable via the pulley.
To reinstall the new spring:
- Bolt one end of the spring back to the I-bolt. Refer to the picture you have taken to confirm you have assembled it correctly.
- Bolt the I-bolt back to the bracket. Again, refer to the picture to ensure all is correct.
- At this point, your new spring should be dangling off your wall bracket.
- Thread the security cable through the new spring, and tie the table down. Use the lineman’s plier to tighten the knot of the cable to the bracket.
- Next, get to your pulley, and remove the duct tape.
- Bolt the other end of your spring to the pulley. Check the picture you just took to ensure you have assembled it correctly.
Step 5: Lubricate And Test
Now that you have reassembled the new spring, you can check your work and test if everything is working. Then you can apply the finishing touches to ensure your spring will serve you for years to come.
- Check every part you have worked on with pictures you have taken. Ensure things are bolted and assembled correctly.
- Once confirmed, take your WD40 or garage door and spring grease, and spray generously on the spring. This lubricates the spring and further protects it against rust.
- Remove the ladder.
- Remove the c-clamp from the tracks.
- Now try to close the garage door.
- If your door is manual, pull and close it. The door should feel light; as you close, you feel some resistance that slows down the door the closer it gets to the floor.
- If your door has an electric motor, plug the motor back in, and engage it. The door should close easily, and your motor should not sound like it is strained.
- Observe the positioning of the springs. They should be well-tensioned and pulled out well.
- Now open the door again.
- If your door is manual, it should feel light and easy to open, as when the garage door is new.
- If your door has an electric motor, the door should be opening up at a steady speed, and the motor should not sound like it is strained.
- Done! Give yourself a solid high five, and make yourself a cup of coffee to celebrate.
How Much Does It Cost to Repair or Replace the Garage Door Springs?
If you want the job done by professionals or DIY, Here is up-to-date info at Homeadvisor.com and Homeguide.com
https://homeguide.com/costs/garage-door-spring-replacement-cost
https://www.homeadvisor.com/cost/garages/garage-door-spring-repair/