
The Truth About French Cleat Walls (Organization & Usefulness)
This post contains affiliate links.
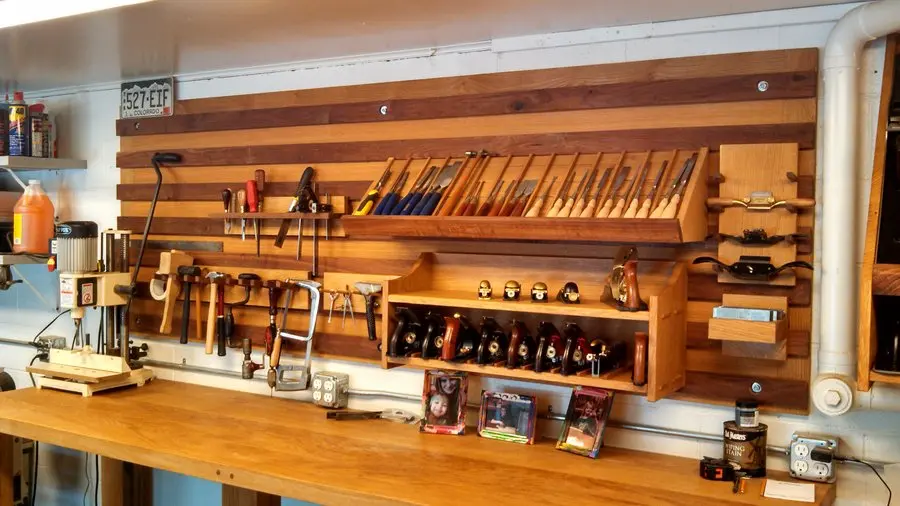
When it comes to wall organization in garages, one of the most popular systems is the French cleat walls. This is a great, flexible system that may work well for your garaging needs. However, are they as good as many said?
French cleat walls are known for their flexibility, with easy storage and expansion. They are also very durable and can handle a lot of weight. French cleat walls, however, may not look as elegant. Unused areas may trap dirt too. It is best for garages or workshops.
This article discusses French cleat walls, specifically how good they are. We also look at the steps to install a French cleat wall system and answer common questions about it.
What Are French Cleat Walls?
A French cleat system consists of a pair of interlocking strips at around a 30 – 45 degree angle. The strips are usually made of wood. You secure one part of the wood strip to the wall. The other strip is secured to items and mounted onto the first strip.
French cleat walls are also known as French cleat systems. It is one of the more popular methods of organizing and storing items on walls. Some also call it wall-mounted cleats.
A French cleat system consists of a pair of interlocking strips, usually made of wood. You typically take a 2 x 4 strip of wood and then cut it at a 30 – 45 degree angle. You secure one part of the wood strip to the wall.
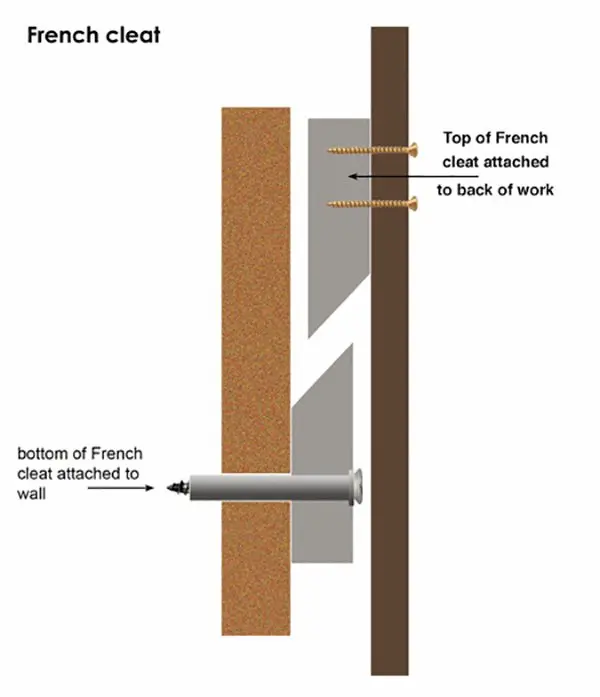
You then take your storage container and holder and screw it into the second strip. The second strip is then placed on top of the first strip. This forms a strong interlocking system that secures your items on the wall.
French cleat walls are known for their excellent strength and durability. This is because of the angled bevel. It allows the weight of the object to be distributed along the length of the cleat. This prevents the cleats from breaking.
The angled bevel also allows easy sliding of the cleats to a desired position. You can maximize storage better this way.
If you are OK with woodworking, you can also easily build your French cleat walls. There are also French cleats made from metal or alloys, which you can purchase online.
Despite the name, French cleats do not come from France. It is uncertain how the name French cleats is used to describe the interlocking system. Some speculate that the term may be associated with how the system looks elegant, like French craftsmanship.
Why Are French Cleat Walls Popular?
French cleat walls are popular because of many reasons, such as:
- Versatile
- Excellent Performance
- Adjustable
- Minimal Wall Damage
- DIY Friendly
There are reasons why French cleats are one of the most popular wall storage systems for garages. Here are some of the things that made French cleat walls popular:
Versatile
French cleat walls are very versatile in several ways. You can easily cut and adjust the cleat strips to fit your walls, doors, and windows. All you need is to see through it since they are mostly made of wood.
Another way French cleat walls are versatile is the adjustability. You can easily organize and reorganize your arrangements as you need. This feature may be important if you will add more items to your cleat walls in the future.
Excellent Performance
French cleat walls are also excellent in their performance. The strips of wood may look thin and unconvincing, but they can easily handle a lot of weight.
The secret lies in how it works. The interlocking strips increase the friction. This makes it harder for the items to move around. The strips also help to distribute the weight of the item along its length, allowing it to handle a lot more weight.
There are also French metal cleats. They are even stronger and more durable than French wood cleats.
Adjustable
French cleat walls also are capable of securing your items while at the same time not ‘locking’ them in. You can adjust your items’ position along the cleat strips just by lifting the top cleat up.
As a result, you can precisely adjust the positioning of your items. This means you can easily achieve your desired arrangement. If you enjoy maximizing your storage space, the French cleat wall can easily help you achieve this.
Minimal Wall Damage
French cleats also do not damage the wall too much. This is compared to other traditional wall mounting methods. In most cases, you should be able to mount up strips of French cleats using fewer screws and anchors.
In fact, you can reduce the drilling and holes on your walls even further. You can do this by screwing your cleats on thick plywood. Then you screw the plywood to the wall.
Suppose you decide to rearrange your French cleats later. In this case, fewer screws and anchors on the wall mean holes to fix and patched on the wall.
DIY Friendly
Finally, French cleats are one of the most DIY-friendly wall storage solutions. This is because you can custom-build almost everything you need.
Cut a 4 x 2 strip of wood at a 45-degree angle to make the strips. Secure one strip to the wall, while you can screw your holders and containers on the second strip. This could be done with a miter saw, hand drill, and some screws.
You can custom-build your holder and containers too. Just use some thicker plywood to build them. Secure them to the top cleat strips, and they are good for storing and holding your items.
How Do You Install French Cleat Walls?
To install French cleat walls, you generally follow the process below:
- Choose the Right Material
- Cut the Angles
- Locate the Studs
- Level the Wall Cleat
- Complete the Wall
- Build the Tool Holders
Suppose you are comfortable with woodworking and DIY work. In this case, you should be able to build your own French cleat walls. This is because the process is quite simple and does not require you to have expensive, high-end tools.
Below is the general process of how to build a French cleat wall:
Choose the Right Material
The first step is to choose the right material for your French cleat wall. The general rule here is that you want a straight solid hardwood. The idea is to ensure the wood strips are durable and can handle the weight you throw on them.
You can visit your local lumber store and pick up some 4 x 2 planks of dried hardwood, preferably oak or maple. Avoid softer but cheaper wood such as cedar or pine. Choose 4 x 3 or 5 x 3 planks if you want stronger cleats.
When shopping, look down on the wood to ensure they are as straight as possible. Do not pick any wood that shows signs of warping or excessive bending.
Once you select your wood, ask the lumber store to plan the wood for you. This ensures you have the flattest and straightest strip of wood as possible. This will ensure you have straight cleats.
Suppose shopping for solid wood planks is a bit difficult for you. In this case, you can also opt for construction-grade plywood. You do not need to look for overly high-quality ones here; a CDX grade may work fine.
Cut the Angles
Now that you have your wood planks nicely planed and straight, you can now proceed to the next step, to cut the wood.
You will cut the wood twice, first into strips of the right length and second into angled cleats. The first cut is easy; you can use any saws you have. However, circular and miter saw should produce a nice straight cut.
For the angled cut, you will need a miter saw. If you do not have a miter saw, you can request your lumber store to help you perform the cut. If not, you may be able to rent one from a local hardware store.
The angled cut is usually around 30 – 45 degrees, depending on your preference. There is no set rule here, so do what you feel is right.
Once you finish cutting, give the cleats a good sanding to smoothen rough edges. You can also apply some finishing to the cleats if you want. You can just apply some Tung oil to protect the wood, or go all out and paint it.
Locate the Studs
Now that the cleats are ready, you can proceed to the installation process. You will basically secure one of the cleat strips onto the wall. You do this by screwing the strips and the wall studs together.
The issue is the wall studs are usually hidden behind the wall. This means you need to first locate where the studs are. There are some ways you can locate studs on your garage wall:
Locate Light Switches or Power Outlets: Look for the nearest light switches or power outlets on the wall. These are usually screwed on directly to wall studs.
From that point, you can assume there is a wall stud every 16 inches from the outlets. This is because most building codes require that. However, some areas allow 24 inches distance between studs, so you need a way to confirm this.
Tap The Wall: To confirm you are in contact with a wall stud, use a hammer and tap on the wall. If there is a wall stud behind, the sound should be solid. If there is nothing but insulation and hollow space. It will sound hollow.
Use A Stud Detector: If you prefer a more scientific approach, get a wall stud detector (paid link). This machine scans the wall for density. The detector lights up when it detects a dense wall, meaning behind the wall is the stud.
Once you confirm the stud location, mark it. Later, you will use it as a guide when screwing your cleat strips into the wall.
Screw In The Bottom Wall Cleat
The next step is to screw in the bottom wall cleat. This is a simple process, although it can take some time. This is especially if you are creating a large French cleat wall.
To perform the installation work, prepare the following tools: (links to Amazon)
- Impact drill
- Screws
- Wall anchors
- Level ruler
- Any safety gear you need to perform the work well.
Start by placing one end of the cleat strip against the wall, and screw it into the wall slightly. The idea is to secure it but allow the other end to move up and down. Before screwing, ensure the deeper side of the cleat is facing into the call, and the ‘taller’ side faces out.
Now, take a level ruler, and place it on top of the cleat strip. Move the unscrewed end up and down until the cleat strip is level. Once you confirm this, screw in both sides of the cleat strip.
You then repeat the process again and again until all the bottom cleat strips have been screwed on. When screwing, you should feel some resistance as the screws drill into the wood and the studs. If there is little resistance, recheck your positioning.
You also want to spend some time testing the fit of the top cleat strips. This ensures that they fit well with your bottom strips.
If you wish to reduce the number of screw holes on your wall, you can also look for thick plywood to serve as the base of your French cleat walls.
You first screw and secure the bottom cleats onto this base plywood. Then you screw the base plywood and the cleats onto the wall. This approach, however, will cost a bit more since you need to buy plywood sheets.
Build the Tool Holders
You have screwed in your bottom cleat strips. Now, it’s time to build the holders and containers to attach to your top cleat strips.
There are no specific instructions here aside from simply building what you need. For example, suppose you are looking to store a bunch of caulking tubes. In this case, you can use plywood and build cubicles that fit them.
You can also build cabinets to store and hide things inside the doors. You can usually build out what you need using thicker plywood, screws, and wood glue.
Once you build these holders and containers, screw them to the top cleat strips. Then, you can mount them to the bottom cleat strips on the wall.
How Much Do French Cleats Cost?
A regular 8 x 6 feet French cleat wall may cost you between $250 – $500. The cost of a French cleat wall varies, depending on the material, size, and customization. If you do it yourself, it could cost less than to hire out the work.
If you are looking at the cost of building a French cleat wall, it may be hard to give you an exact figure. This is because many factors may determine the final cost of the project.
For example, if you use solid oak wood strips, it will cost more than if you use CDX construction plywood. If you are looking at putting French cleats on a 20 x 8 feet wall, it will cost more than something smaller.
Of course, we have not added factors such as workmanship. If you hire out the work, it will cost more than if you do it yourself. If you intend to build a lot of custom holders and containers, that will also soak up some additional budget.
However, suppose you still want a ballpark figure. In this case, a regular 8 feet wide and 6 feet tall French cleat wall may cost you between $250 to $500. If you use construction plywood, the cost will be lower.
FAQ
What Wood Is Best For French Cleats?
The best wood for French cleats is solid, dried hardwood. Woods such as oak or maple are perfect for French cleats. When shopping for these woods, look for 4 x 2 planks. Also, ensure they are as straight as possible and do not have warping or bending issues.
You can also use construction-grade plywood, such as CDX, to save costs. They may not look great, but they get the job done well.
What Is The Angle For French Cleats?
Most builders opt for a 45-degree angle when cutting their French cleats. This cutting allows a good grip and prevents the cleats’ edges from being too sharp. When they are too sharp, the edges may break easily.
However, some builders go for steeper angles, such as 30°. Traditional French cleats also use 30 degrees. The idea is to reduce the odds of the cleats’ edges breaking off.
How Much Weight Can French Cleats Hold?
If secured properly, a French cleat strip can easily hand on the weight of an adult male. However, the weight ratings of your French cleat may depend on many factors.
These include materials, how you secure the cleats to the wall, and the length of your top cleats.
If you are hanging something heavier, allocate a longer top cleat strip. This allows the weight to be distributed along the strip, helping it hold well.
Are There Other Wall Organization Systems Aside From French Cleats?
Aside from French cleats, other popular wall organization systems include:
- Pegboards
- Rail and track system
- Slat wall
French cleat walls may not be the most elegant solution compared to these systems. However, it is one of the strongest. French cleat walls are definitely the most DIY-friendly compared to all these solutions.
Suppose you are keen to discover these wall organization systems. In this case, feel free to check out our full guide on garage wall systems.