Garage Wall Systems (Complete Guide)
This post contains affiliate links.
Using the wall is one of the best ways to organize your garage. This is because it is a highly customizable vertical surface – You can easily use it to store and place things. However, there are many options for garage wall systems, which means it can be hard to choose.
The most common garage wall systems today are:
- Pegboards
- Slat wall
- French Cleat Wall
- Garage Rail/Track Wall System
This post looks at the common garage wall systems in the market. We explain how they work and what their strengths and weaknesses are. We also consider what you should consider when shopping for a garage wall system.
How Many Garage Wall Systems Are There?
| Wall Systems | Pros | Cons |
| Pegboards | -Very flexible. -Cheap to install. -Easy to install. | -Low weight limitation. -Not as nice looking. -Not suitable to store large items. |
| Slat Walls | -More customization. -Higher weight rating. -Better looking. | -More expensive than pegboards. -Compatibility issues. -Takes up more space. |
| French Cleat Wall | -Excellent strength. -Very good versatility. -Easy to install. -DIY. | -Potential for gaps. -Harder to store small items. -Not as nice looking. |
| Rail/Track System | -Easy to install. -High weight rating. -Easy adjustability. | -Costly. -Compatibility issues. -Not as nice looking. |
When it comes to garage wall systems, there are four major popular options in the market today:
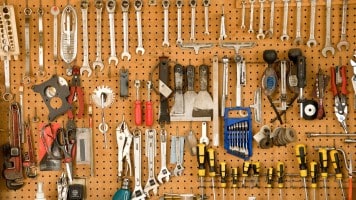
Pegboards
Pegboards are a board with a grid of pre-drilled holes. Hooks or pegs are then inserted into the holes to form a holder. You can then hang items or mount larger containers to two or more pegs to store larger items.
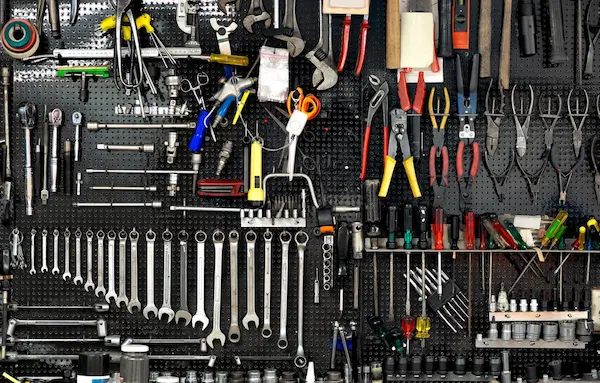
Pegboards are made of wood-based materials such as MDF, solid wood, and plywood. Metal and plastic pegboards are also becoming common.
Pegboards can hold 50-200 lbs if properly installed. Metal pegboards are the sturdiest.
Pegboards come in standard sizes or can be cut from large sheets to the extent you need.
Pros
Cheap: Pegboards are a fast and practical way to store and organize everything. They are also cheaper to purchase than the other wall systems on this list.
Flexible: Pegboards are also incredibly flexible. There are many types of different hooks and brackets to accommodate anything you want to hang. Metal and plastic pegboards are available in a variety of colors. There are also plain galvanized steel versions.
Easy To Install: Pegboards are also easy to install. They often come in lightweight boards or tiles. You then secure them to the wall and hang them in the hooks and pegs.
Cons
Less Sturdy: Common pegboards usually cannot handle a lot of weight. This is due to how pegboards are built, with tiny holes and smaller pegs and hooks. There may be sturdier pegboards, but they need to be made of steel.
Not As Nice Looking: One common criticism of pegboards is their aesthetics. Things are usually left hanging on the boards, making them look cluttered.
Less Suitable For Larger Items: Pegboards also do not have large hooks and pegs. This means they are not able to handle large items with more weight. Metal pegboards and hooks may improve, but they are not as strong as other wall systems.
Read More: Pegboards For Garage Organization
Slat walls
Slat walls are also called slot walls in some countries. Slatwall uses panels with horizontal grooves to hang up things.
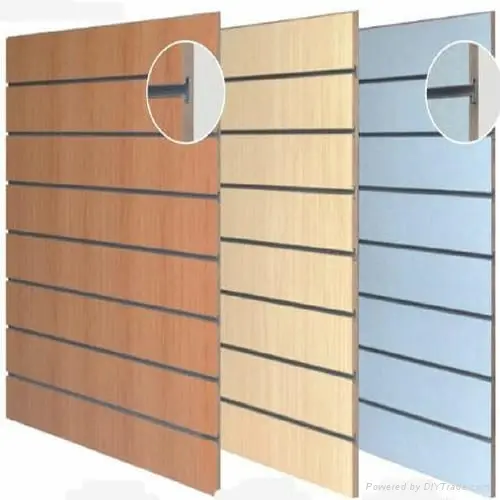
Slat walls are a popular way to organize tools and equipment. Slat walls are great for storing almost anything – from small items and tools to heavier objects. You can quickly and easily change objects’ places with or without additional accessories.
Slatwalls are available at hardware stores or online. Materials include PVC, Aluminum, Steel, or reinforced wood. Modern Slatwall systems are modular and easier to install compared to wooden ones.
Your choice of slat wall materials may depend on your needs. For example, steel or aluminum slat walls may reduce fire hazards. They add fire resistance if you use your garage as a workshop or work with flammable materials.
Pros
More Customization: Slat walls generally allow more customization compared to pegboards. The horizontal grooves allow you to create custom containers and holders. You can then mount these containers to the slat wall. Slat walls can look great in your garage and are available in many colors.
Higher Weight Rating: Slat walls can handle more weight compared to pegboards. Slat walls are better secured to the back wall. The weight of items on a slat wall is also distributed more widely across the slats. This made slat walls popular with garages and workshops.
Better Looking: Slat walls usually look so much better compared to pegboards. This is because the grooves are less visible. As a result, slat walls are popular in shops and bookstores to display products.
Cons
More Expensive Than Pegboards: Slat walls are usually more expensive than pegboards. This is because they require more engineering to make. Setting up a slat wall system may cost up to three times compared to having a pegboard.
Compatibility Issues: Slat walls are often produced in a customized system. This means many slat wall makers deliberately make slat walls with different measurements. The idea is to make you purchase the official accessories.
Takes Up More Space: Slat walls are thick. This means you may lose some clearance on your garage wall after you have mounted them up. This may be an issue if you have a small garage, where every inch of space matters.
Read More: Slat Walls For Garage Organization
French Cleat Wall
The French cleat wall sounds special but resembles a Slat wall or track system.
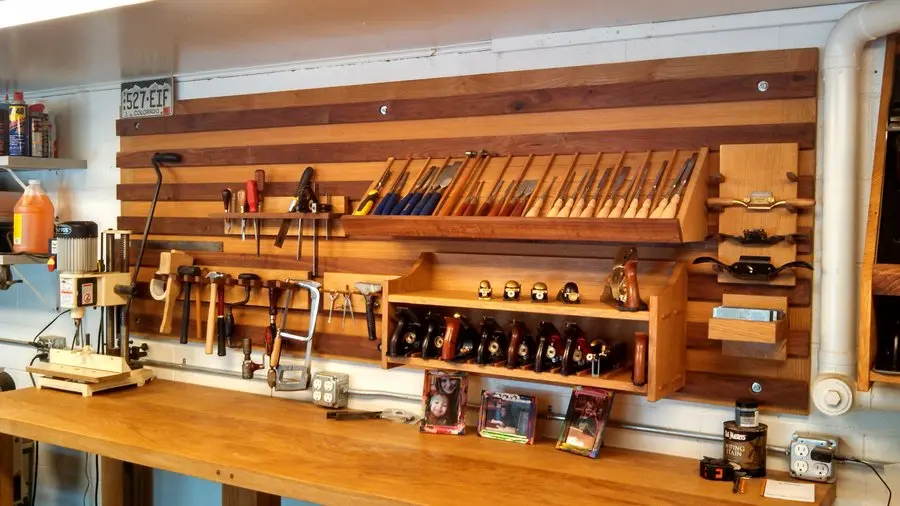
The only major difference is that French cleats are almost always wood-made. French cleat wall also uses a specific cleat system to secure objects to the wall instead of slats or holes.
One cleat is attached to the wall with the angle facing up. The second cleat is secured to the back of the item you want to hang facing down. This causes both cleats to interlock together and form a strong bond.
Pros
Excellent Strength: French cleat walls have excellent strength. This is because they are very securely attached to the wall. On top of that, the more weight you place on the cleats, the more securely attached they become.
Very Good Versatility: French cleat system may also work well for DIYers. You can custom-make your cleats and then design the containers you want. You can also slide the top cleats and the containers around, freeing space.
Easy To Install: French cleats are easy to make and install. Just get a strip of 4×2, and cut the wood at a 45° angle. Then mount the bottom of the cleat to the wall and the containers to the top cleat.
Cons
Potential For Gaps: One issue with French cleats is the gaps. Unlike slat walls, you need a larger gap for French cleats. This means you may not be able to have as many hanging spaces with French cleats compared to slat walls.
Harder To Store Small Items: Slat walls may need you to create specific, smaller containers to store small items. This is because the cleat systems are designed to be sturdy, which means they are larger.
Not As Nice Looking: French cleat walls can look less polished than slat walls. This may explain why cleat walls are usually used in workshops or garages, not showrooms or shops.
Read More: French Cleat Walls For Garage Organization
Garage Rail / Track System
The Rail and Track system works about the same as slat walls. However, you use individual tracks. Rails are smaller and more customizable, allowing you to install only one or two rails if needed. Some models are also stackable.

Rails are available at different lengths. Some standard lengths are 48, 56, and 84 inches. You can use various hooks, holders, baskets, or other accessories.
Track systems are made of plastic or steel rail and plastic covering. Popular Brands Include Ultrawall, Rubbermaid, and Gladiator. Check out the most popular brands of track systems at Amazon.
Pros
Easy To Install: Rail and track systems can be easily installed. In fact, it comes in a plug-and-play system. Simply screw in the rails, clip in the covers, and then slap on the hooks, holders, and baskets you need.
High Weight Rating: Most rail and track systems are commonly made of stainless steel. As a result, they tend to have strong holding ability and a high weight rating. This means you can hang heavy things on them.
Easy Adjustability: Rail and track systems have many hooks, containers, or holders. You can also easily adjust the position of these items to free up space to hang more things.
Cons
Costly: Rail and tracks can be expensive, although not as expensive as slat walls. A track and rail usually cost around $20, and your cost will increase. The final costs may depend on the number of tracks and rails you need and the accessories.
Compatibility Issues: Similar to slat walls, many tracks and rail makers try to make it harder for you to use other accessories. This means you may need to return to the official rail and track systems accessories.
Not As Nice Looking: Rail and track systems do not look as nice as a slat wall. This may explain why they are used only in garages or other industrial settings. You do not really see rails and tracks in retail stores.
Read More: Rail & Tracks Systems For Garage Organization
What To Consider When Buying Garage Wall Systems?
When shipping for garage wall systems, consider the following to ensure you get the best deal:
- Aesthetics
- Storage Space Needed
- Quality and Durability
- Load Capacity
- Ease of Installation
- Variety of Accessories
- Ease Of Use
Wall systems are probably your best weapons to organize and store things in your garage. However, it can be hard to choose what suits your needs well.
Consider the following factors below when making decisions. These factors should help you pick the best wall systems for your garaging needs.
Aesthetics
Aesthetics refers to the beauty or looks of your wall systems. This can be very subjective; some may like a minimal look, while others do not care.
One good thing is that these wall systems come in all sorts of customization. You can select colors, textures, and finishes that suit your eyes.
If you like a functional yet minimal look, you will do well with a slat wall. The slats do not stand out as much as the gaps between French cleats or rails.
You also get to customize the look and feel of slat walls, from color to texture, to the size of the slats. This is why most commercial stores use slat walls.
However, suppose you are the type that simply does not care about aesthetics. You also only want the strongest and best-performing garage wall systems. In this case, you cannot go wrong with a French cleat wall system.
Storage Space Needed
Some of these garage wall systems can hold more things than others. These systems may work better if you need to maximize your storage space.
Take, for example, slat walls and French cleat walls. You can cover the entire garage wall with them if you need them. You can also cut them shorter to accommodate windows, doors, and more.
You may still cover your garage walls with rail and track systems. However, they may not be as flexible as slat or French cleat walls. This is because cutting into these metal rail and track systems may be harder.
If you are not too worried about maximizing the wall storage space, you could do fine with pegboards.
Spending more money on slat walls may look expensive on the surface. But do understand that more storage space helps to increase the house’s valuation.
Quality and Durability
Another thing to consider is the quality and durability you need. Suppose you want to keep light and simple items such as electronic gadgetry. In this case, you may get away with something as simple as a cork pegboard.
If you want to store something heavier but want a nice wall, a slat wall works. For commercial use, however, consider using slat walls with better durability. Look for panels with metal slats and coated surface finishing.
French cleat walls may work better if you want to store heavy-duty items. Use 4 x 3 wood for added strength and durability. It would be best to use hardwood, such as oak and maple. They are more durable than cedar or pine.
Load Capacity
Load capacity focuses more on the performance of the wall systems. It is also related to ensuring you have enough wall storage systems to hang what you need.
First, ensure you have enough hanging space for all your items. On top of that, you also want to think forward and project if you need more in the future.
All garage wall systems here allow expansion. You can expand your storage by adding more pegboards, slat walls, or tracks. However, French cleats and rail/track systems may be easier. This is because they can accommodate your garage walls better.
Ease of Installation
Your decision on this area will depend on your comfort level with DIY handiwork. If you are good with this sort of work, you can select any of the wall systems. Some may take a bit more work to install, but you should be able to do it.
However, suppose you are not too technical with drills and saws. At the same time, you still want to install the wall systems yourself. In this case, you may be better off working with simpler systems like rail/track systems or pegboards.
These are easier to install and should not require very precise work. French cleats and slat walls may be the hardest to install. This is because you need to do proper measurements and cutting. French cleat walls may be the hardest.
You can, of course, spare yourself all the trouble and pay for professionals to come in and do the work. Call it paying for time, efficiency, and better workmanship.
Variety of Accessories
The accessories are another aspect you want to consider with your garage wall systems. Some wall systems come with more customized solutions for you, while some may not have any. You actually have to make them yourselves.
If you are comfortable with woodwork, then setting up a French cleat system is best. Then you custom-make all the accessories you need. All you need is some thick plywood.
If you are going with slat walls, rails, tracks, or pegboards, you should be able to find many accessories. However, check if the system you are eyeing takes other accessories.
This is because there are wall system makers who make other accessories incompatible. This forces you to purchase the official accessories, which may be expensive. You are limited in options too.
Ease Of Use
One more matter to consider while shopping for a wall storage system is ease of use. You want a storage system that is easy to use, maintain, expand, and customize.
All four systems are good enough in their own aspects. However, some may be easier to hang things than others. For example, you can hang your bicycles more easily on a rail/track system than on a pegboard or French cleat wall.
You also can think about shifting too. Storage systems such as French cleat walls or slat walls may be easier in this department. You can easily shift the containers of holders around to free up space.
What’s the Best Wall Storage System?
The best wall storage system will depend on your needs; there is no one way to decide which is better than the other. Before choosing, spend some time thinking about what you want from your wall systems.
Some things in this world are straightforward, while some are not. When it comes to the garage storage system, unfortunately, it’s the latter.
All four systems have their own strengths and weaknesses. This means the best wall storage system for your garage will depend on one thing – what you need and want.
Suppose you want nothing but the sturdiest, toughest storage system. You may do well with rail/track or French cleats in this case. A pegboard should do you well if you do not need too much strength and want to keep costs low.
Suppose you are ok with trading away some strength and getting an elegant, beautiful system. In this case, you cannot go wrong with slat walls.
If you want a solution that you can later expand and grow, a French cleat wall or rail/track system may be perfect. A French cleat wall may also work very well if you want to create a customized holder for your things.
The best way to approach this subject is to consider what you want from your wall storage. From there, select a system that you think can do the best job.